
What are the stages of rebar planting using planting glue?
In this article, we discuss the process of planting rebar using planting glue. To buy and know the price of super lubricant, tile adhesive, anti-acid mortar, rebar planting adhesive, concrete restorer, epoxy and antifreeze grout, etc., you can contact Shimi Abadgaran Company. Call.
فهرست مطالب
- 1 What are the stages of rebar planting using planting glue?
- 2 Now let’s check step by step the method of planting rebars using glue planting technique:
- 3 Step 1: Installation and arrangement of rebars
- 4 Step 2: Temporary fixation of rebars
- 5 Step 3: Clearing and cleaning the rebars
- 6 Step 4: Sandblasting and cleaning the joint position
- 7 Step 5: Preparing planting glue
- 8 Step 6: Checking and verifying information
- 9 Step 7: Use planting glue
- 10 Step 8: End of verification of installation location
- 11 Step 9: Placement of cut bricks
- 12 Step 10: Permanent fixation of shear bricks
- 13 Purchase and price of super lubricant, tile adhesive, anti-acid mortar, rebar planting adhesive, concrete restorer, epoxy grout and antifreeze company Shimi Abadgaran
- 14 the address of Central office
- 15 Address of Shahriar factory
What are the stages of rebar planting using planting glue?
Planting rebars using planting glue (glue planting technique) is one of the widely used methods for connecting and increasing the strength of rebars in buildings and metal structures. In this article, we examine in detail the steps of planting rebars using the glue planting technique.
Before discussing the steps of planting rebar using planting glue, we must first familiarize ourselves with the characteristics of this type of glue. Planting glue is a type of two-combined glue that consists of two different parts: The first part of the adhesive is a cylinder made of resin-based epoxy adhesives, and the second part is a powder called hardener powder, which strengthens and hardens the adhesive. This adhesive is very powerful and due to its good resistance to heavy loads, high durability and suitable viscosity, it is used to connect rebars together.
Now let’s check step by step the method of planting rebars using glue planting technique:
Step 1: Installation and arrangement of rebars
At this stage, the first step is to transport and install the used rebars (in cylindrical form and standard diameter with different lengths) to the workplace. After transporting the rebars, they should be accurately placed in their installation location and using a tool such as a rubber level, check how much of them are up or down and whether they have a uniform height or not. After ensuring the accuracy and correctness of the arrangement, the rebars needed to be connected together are prepared for the next step.
Step 2: Temporary fixation of rebars
After arranging the rebars accurately, the rebars are drawn out on the computer using AutoCAD computer software, and the exact connection points of the various rebars are drawn in it. For this, a feature called drilling is installed at the end of each rebar and allows the rebar to be drilled into the fluids.
At this stage, after creating a precise line with the existing fluids, the rebars are temporarily fixed to the fluids by hand or by using some kind of clamps (called rebar clamps) to protect their connection points. The desired height and accuracy should be fixed permanently.
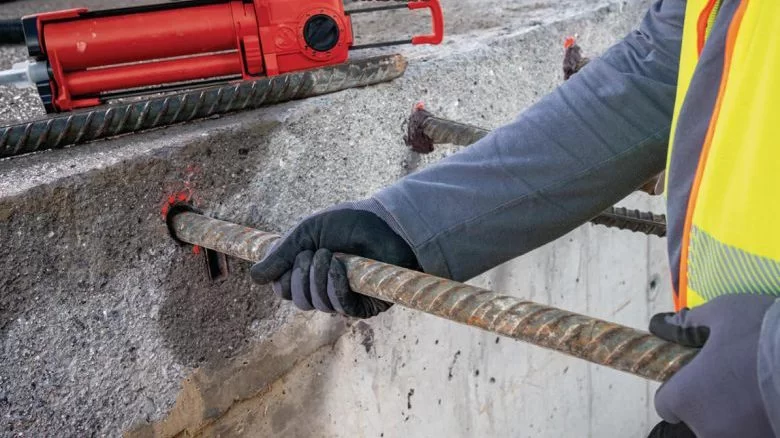
Step 3: Clearing and cleaning the rebars
At this stage, the rebars are checked with a metal lamp and some other tools to make sure of the presence of soil and deposits on their surface. Also, the durability and stability of the adhesive is improved on a completely dry, clean substrate without any grease or anything else.
Step 4: Sandblasting and cleaning the joint position
After cleaning the surface of the rebars, the place where one rebar is supposed to be connected to the other should be accurately numbered and sanded so that these two points can be easily connected using planting glue.
Step 5: Preparing planting glue
At this stage, the required amount of hardener powder is added to the epoxy glue and mixed well for a few minutes to activate the glue well.
Step 6: Checking and verifying information
kBut from the continuation of this stage, it is necessary that before this two quadrilateral points have been cut in certain areas on each colon and explained in this way. At this stage, before starting to use the glue, the places where the connection should be made are checked and confirmed. For this, a meter and sometimes a large rotator are used to check the exact size and position of the two points. If any problem is observed on the connection point, one should refrain from further work until this problem is solved, and then by making the necessary adjustments, determine the connection location accurately.
Step 7: Use planting glue
At this stage, implant adhesive is injected over the connection point and the rebars, which were initially temporarily fixed, are drawn together permanently. Here it is necessary that the two points must overlap, that the best action that can be done is to do a complete check and make sure that the size and position of the two points are correct and that these two points overlap in accordance with the drawing.
After injecting the glue, the rebars are supposed to be precisely placed on the integrated points in the structure. For this purpose, a clip or knotted package called a clamp is used to permanently fix the rebars. This knitting package is finished in the shape of one of the normal clamps, but with other features of making a knitting package.
Step 8: End of verification of installation location
At this point, it is confirmed that the rebar is accurately positioned. For this, a tool such as a smart check meter should be used to accurately measure the distance from the surface of the walls to the marked point. Also, it is checked that the rebars are accurately placed in vertical and horizontal relations and their points are placed on the central planting glue.
Step 9: Placement of cut bricks
Once the rebars have been accurately placed on the central planting glue, the cut brick factories are marketed and these bricks are placed on each joint point. The cut bricks must be placed precisely in the size and shape that is needed; You should also avoid facing the bricks.
Step 10: Permanent fixation of shear bricks
At this stage, using a rotator, glue, and clay, the cut bricks are placed in place and permanently connected. After installing the shear bricks, it is necessary that all the clips and clamps used by the variable device are installed when the glue is completely dry.
At the end of this stage, the work of planting the rebars using planting glue is finished. This method is very popular and widely used due to its high speed and good efficiency. In addition, planting glue is one of the best ways to connect rebars together, and it does not require a lot of raw materials in its preparation and use. For this reason, it can save other raw materials and reduce the construction costs of metal structures and buildings.
Read more: Epoxy rebar planting glue